"So if I can offer people just a little bit of a distraction from that, and show them something that is beautiful, or that makes them say “Oh, wow” then that's really what I want to do. I'm fully okay not having a message in my work. There's nothing lofty or intellectual or political or anything like that. No messaging in my work. It's just like, "Oh my gosh, look at this. Isn't this cool? Isn't this pretty?" And for me, that's the whole story and that's enough that beauty.”
Intro:
Welcome everyone to another episode of The Camera Cafe Show, your go-to podcast for all things photography. I'm your host, Tom Jacob, and yes, we have an amazing Masterclass for you waiting, and therefore as you can see we have a good 50 minutes + episode today...but he folks, this is a podcast, this is not a timeline on your IG or a 90 seconds TikTok video you casual flick through...we make this podcast to enjoy and to inspire you in this amazing creative outlet which is photography. Just listen to it whenever you can, and just hit pause and come back to it another day, that's the beauty of a podcast. That said, let's move on:
Today we welcome Rain Hayes on our show, a visionary photographer and Kelby One instructor, renowned for her captivating work in infrared and ultraviolet photography. Her unique approach and creative vision have set her apart in the photography community, making her an innovator in exploring light beyond the visible spectrum.
In this episode, Rain will share her journey from traditional photography to mastering these specialized techniques, along with her practical experiences, and the fascinating projects she has undertaken. Whether you know how to take IR and UV pictures or you are curious enthusiast, you're in for a treat. So, grab your favorite drink, sit back, and get ready to be inspired by the amazing Rain Hayes on The Camera Cafe Show! Let’s get rolling.
Tom: Hello, the Lady of the Unseen World. How's Oakland Bay today doing Rain?
Rain: It is fantastic, a very warm, overly warm, late spring day. I guess we're technically into meteorological summer now. So happy summer to you and everyone else. It's a great time for indoor photography.
Tom: I was going to say it's a great time for bug photography, because I think last time when we talked, you mentioned something: “Okay. I will try to make bug pictures. I will try to find a bee.” So how far we are in this process, Rain?
Rain: Well, I went out one day, I was very successful in photographing a lot of bees and at my garden location. There happened to be an entomologist who specializes in bees, who was there at the same time also taking pictures. So I got to learn a lot from an expert about the varieties of bees in our area.
So it was great timing and I'm way behind on processing all of those bee images as per usual. But I'd like to go out again and keep trying and photographing them in infrared. And so they're a little different, you know, focus is a little bit soft and they almost come off a little more abstract. Unlike the bug images that I see you doing, your bees are incredible. All of this pollen everywhere and super detailed and high color. Yeah. I always get a little motivated when I see your bee images online.
Tom: If you just sit still long enough they will come Rain. No problem.
Rain: I have a friend who I just discovered has beehives in their backyard. And so I think I'm going to go hang out in their backyard and hope that none of the bees dislike what I'm doing there.
Tom: Just be careful for onlookers because sometimes we have to lie flat on the ground or make strange body movements when shooting macro. If there's anyone passing by, they will look very intriguing to you.
Rain: It's a backyard, so hopefully no one will see me.
Tom: That's ok then. Rain, tell me a bit about yourself... Photography. It was something you went to study or was like a happy coincidence you found years later, somewhere?
Rain: I grew up with the understanding that a person should just own a camera the way you should own a bicycle. It's just kind of a tool of life. So I had a Pentax 1000 when I was growing up and shot film and learned how to process and print. I went years without really taking photography very seriously. But I still owned cameras and I decided to take a little photo adventure one weekend and drove up the coast of northern California and just took pictures of the places I was visiting.
And I just kind of had this thought, you know, I could do this every day for the rest of my life and not get bored. So I've been trying to move closer to that goal ever since. And for the past six or seven years I've been focusing almost exclusively on infrared photography. Which is a whole separate adventure that I've gotten really deeply into, as you know.
And it's not something that I ever really had an opportunity to study in school outside of the film class that I took as a fourth grader, 9 - 10 years old. But I have gravitated toward it now because it is so easy to create a finished product, a finished image in such a short amount of time.
It's overwhelming the number of images that you can take. And just pick the best one when there's probably like 10 more that you could choose as well, and continually get better. I sometimes say, and I'm not trying to be cynical, but I sometimes say that I do photography because it's so much easier than painting, but it's really true when it takes six months to make a painting and then six months more for it to dry, your months into a project before you know if you even like it.
And it's just one single image. So I get a lot of satisfaction out of being able to make images, you could do several a day. My editing process is pretty involved. So it takes me a lot longer than someone who is doing regular color photography, but even still, it feels very quick. And like almost instant gratification.
And so I enjoy it as an activity and I enjoy it as a medium, a way to kind of do a creative thing. And I also love looking at other people's images. We're all basically using the same equipment. But there are so many different styles and so many different points of view that I find it really interesting to be part of the photography community and have access and interaction to everyone who's doing something similar, but also totally different as me.
Tom: You mentioned infrared photography Rain, and then you went on to suddenly have your own KelbyOne class online about infrared photography. It's called “Explore the Hidden World of Infrared Photography.” How came that about?
Rain: So, a couple of years ago I made a friend through social media named Rick Samon. He is an amazing photographer with a long career. He's an educator. He's worked in so many different genres of photography, travel, wildlife, portraiture. So many different things. He's done like underwater photography and you know, used to do print magazines.
And he has sort of become a mentor for me and he made an introduction for me with the folks at KelbyOne. And they had a little bit of infrared material on their website, sort of some special sessions and discussions about it, but they didn't really have like a full proper class. So I worked with them. I went down to Florida where their offices are located in the Tampa Bay, and they produced the class. It was a lot of fun. We went to Miyaka State Park and it was really a wonderful experience. Like the KelbyOne folks are so cool and laid back and, you know, they do great work. I love the way that they produce their classes.
And if you haven't checked out KelbyOne as a member it's very comprehensive. They have some of the best photographers in the world, in my opinion, teaching across so many different genres and for a really reasonable, very low membership fee. You have access to like hundreds of classes for anything that you want to learn. Plus all of their blog content. And they have a whole bunch of different special programs and they do a weekly podcast.
And it's very satisfying to feel like I'm helping other people to explore and check out something that they might not have otherwise, and also to kind of join me in this. False color and glowing foliage and things like that, like everyone is welcome and I'm always super happy when we have more people that are sharing their images online and they're really having a good time with it.
Tom: Now you took me a bit by surprise, with mentioning Rick Samon, because by coincidence, I have him on my list to contact him to talk on the podcast. I didn't do it still though, so Rick, if you listen to this, I will get an email out to you sometime.
Rain: Yeah. Rick's awesome. So I hope you do get to talk to him.
Tom: Rain, apart from what you mentioned, you also run workshops and you also do print sales.
You have a studio at your own house where you print your pictures?
Rain: I do. So before I was a photographer, I worked in several other mediums. Like I mentioned, I was a painter, I also have a long history of sewing dresses and quilts, things like that, I used to be a professional metal sculptor. I've done a lot of different things. So my living situation, since it's just me and my kitty, has mostly been to live in a place that is like, I basically live in an art studio and well, I'm grown up enough that I have like a full bedroom to sleep in. I'm not just sleeping in the middle of where I paint and stuff like that. But I do my own printing. I can print up to 24 inches wide. Anything bigger, I have local print shops that I work with.
But I use different areas of my house for photography. I'm sure we'll talk about UV photography and I actually use the bathroom, the powder room for that. And most of the editing is like right here in my living room. And it's very convenient. This is the way to do it. You want your studio at home, you've got the fridge right there. You can work late and crash anytime. You can get a little work in before your day job in the morning. So I've had external studios before, but I really like working from home and just having everything right here and available. Everything's just out of frame. I have an easel on this side and my big commercial printer is just on that side. You know, we all curate what, what we see on the camera and all my studio stuff is just out of frame.
Tom: I think next time we need a tour around the house!
Rain: You got it.
Tom: Ok Rain, let's start this then. Infrared photography.
To understand it better, I think we we should cut it in two parts. We will do a beginner part and we will do an advanced talk.
Rain: Sure.
Tom: For those, Rain, new in this field, explain me what IR photography is exactly, maybe what extra dimension can it bring to my photography and what is the basic gear I need?
Rain: Yeah. So let's talk about what infrared images look like. When we hear infrared, sometimes we think of like thermal imaging, like Terminator vision. And that is a type of infrared photography, but it's a little different from what we're talking about. If you imagine all the colors that we can see, all the light we can see is, it's just called the visible spectrum. In the whole entire electromagnetic spectrum we can only see a tiny little portion of it. Those are all the colors, like the colors of the rainbow.
When you move outside of the light that we can see just beyond red starts the infrared portion of the electromagnetic spectrum. This is light that we can't see with our eyes, but we have a lot of instruments that we can see this light with, and then translate it into something that our human eyes can see. And infrared, there are different parts. There's near infrared and far infrared.
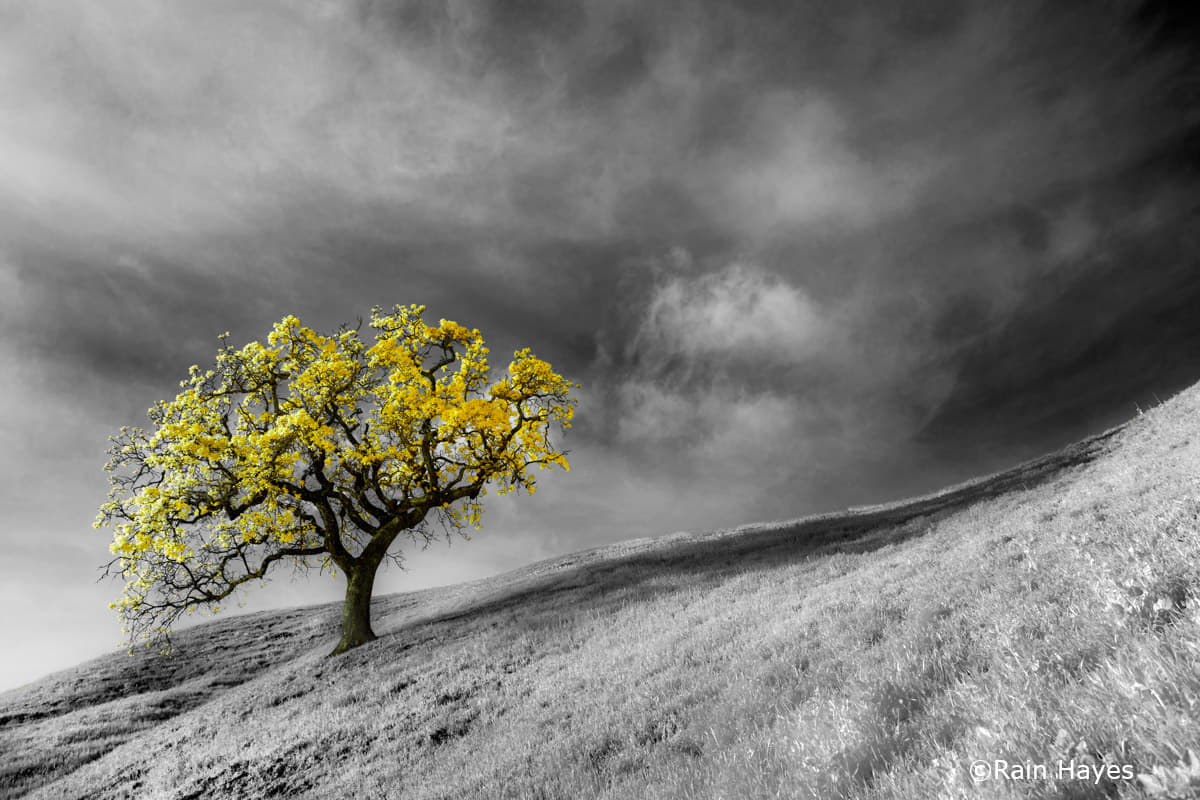
Near infrared is what we use for photography. It's also how the facial recognition works on your phone. It's in all kinds of things in daily life and you don't even know it. So we can use it in photography to highlight foliage, like anything that photosynthesizes takes on this bright white glow. And gives the image sort of a surreal, almost haunted look.
There's no color in infrared light. So, infrared images are typically processed as black and white. But you can also do infrared in combination with visible light. So you're kind of mixing a little infrared and a little visible light, and then that gives you the ability to work with some color and then also have that glow of the foliage that we talked about.
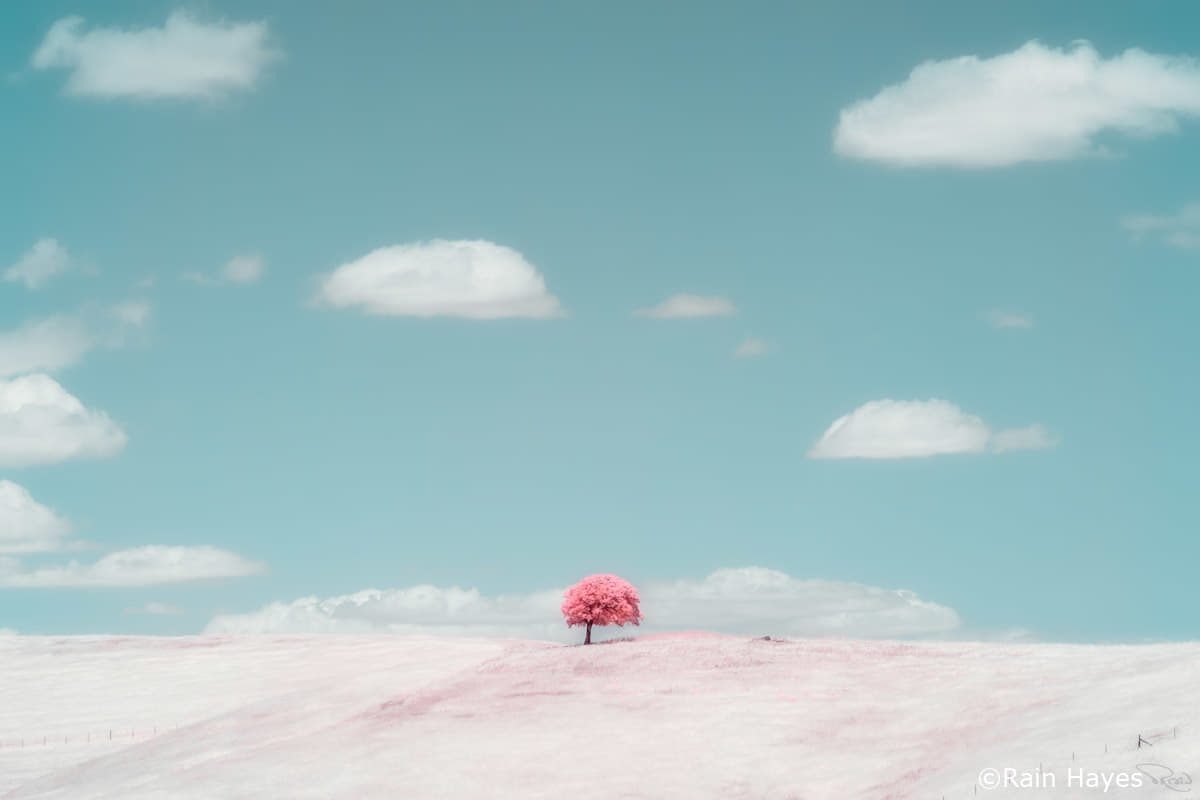
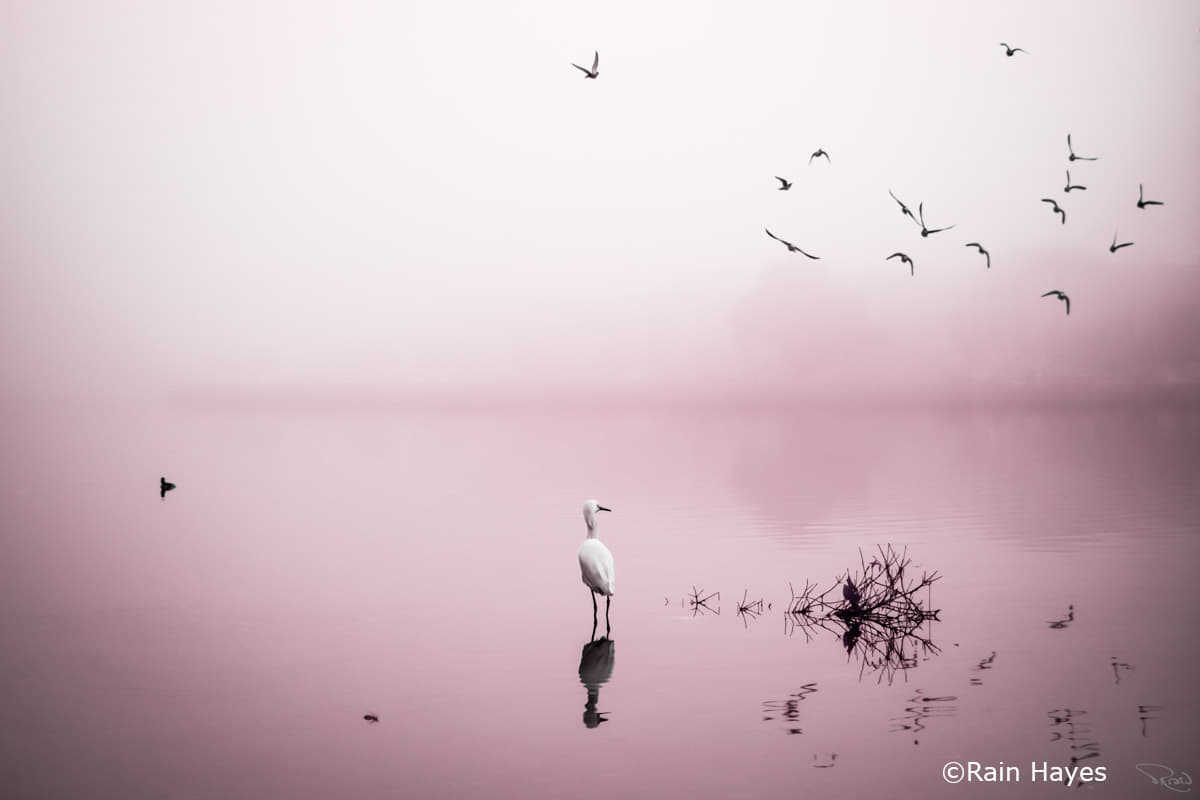
So you would recognize an infrared image that you saw online or in person, because the trees and the grass and everything is usually just glowing like bright white. And you might have a blue sky, or again, it could be processed as black and white. If you look at my infrared images, you'll typically see a lot of that false color. And what that false color looks like, I'm really fun of pink, so I make a lot of pink trees. You can turn the colors, anything you want in post processing, like say in Photoshop. But it's a very interesting and pretty, pretty cool. It's really easy to use medium and the way.
If you just want to get started and see if this works for you, all you need is an infrared filter for your regular camera, or you can even get an infrared filter for your smartphone. You can get a little adapter that sort of clamps on over your camera and you screw on the filter to that. And then you can go out and take your infrared pictures. So the thing that you need to know, if you're doing it this way, is that the infrared filter is very dark. This is a 720 nanometer infrared filter and it's very dark. It's almost black and you can't see through it. It's preventing, it's blocking out all of the visible light that's below 720 nanometers. So when you put it onto your lens, your camera, it's not really getting a lot of light, to be able to expose the image. So you want to use a longer exposure time or I should say like, higher exposures. The way that I typically recommend doing it, is get a tripod and start with like a half second exposure, keep your ISO low and you can go outside and take pictures of whatever you want.
Now, those images are not going to look like what you see online at first, because what your camera sees is red. You're going to see the scene as if it has a red gel over everything. Once you import it into your computer, or you could actually edit it on your phone, you can then edit that as a black and white image and then you'll see that contrast of that really bright foliage and that dark sky, water, lots of detail in the clouds and things like that. So it's pretty easy to get started just with that 720 nanometer filter and processing it in black and white, using editing tools on your phone or Photoshop or Lightroom. Whatever tool you want to use for that. It's pretty easy to get started.
In fact, I should say there is a free guide on my website that will walk you through all of this. And all you need to do is go to the learn link on my website and down near the bottom. You can add yourself to the mail list and that will automatically send the guide to you. My mail list is super minimal. I hardly ever send emails out when they don't when I try to make it something meaningful. So there's not going to be any spam and I don't give my emails away or share them with anyone else. But that's how I would recommend to get started is to get that guide.
Tom: And, Rain, the cost of the filter compared to sending your camera off to get it converted or by buying a converted one, how does this compare?
Rain: Sure. It's a little bit more involved, you know. If you are just buying an infrared filter it might cost you 30, 50, 70 US dollars, depending on what size you get for your lens. If you don't want to be limited by having to do a long exposure and use a tripod, then you can get your camera converted so that it can see infrared without that filter.
There are two different types of conversions that you can do. There is an infrared conversion and you can have it converted to 720 nanometers, or there are other frequencies that we can talk about that you could use, but that is usually a few hundred dollars. All that process really is, is to remove the internal infrared cut-filter that is built into your camera, and have it replaced with a specific infrared filter inside the camera. Then you don't have anything blocking the light, so you can just go out and kind of shoot normally, but your camera can only shoot that specific infrared wavelength.
The other type of conversion, is to get a full spectrum conversion. And that removes that infrared cut-filter and just replaces it with a piece of clear glass. So, you will still need to use a filter on your lens, but you can use any infrared filter you want. As I mentioned a moment ago, you can use other frequencies besides 720nm. Going higher than 720nm up to about a 1000 nm, you just get more and more of that infrared glow. If you go down from 720nm, the filter begins to let in more visible light. And that's what allows you to manipulate the colors into false colors. Just so you know, if you're starting out and you're just getting a filter on your regular camera or on your smartphone, you really need to use the 720nm because lower than that it's not really strong enough to get around the filter that's already inside your camera or inside your phone. So with a converted camera, you can use lower frequencies, but just on your regular camera you need to stick with a 720nm for it to work.
The full spectrum camera conversion advantage is that you can also use it to take regular color pictures just as you could before it got converted. So it's a really nice way to have a lot of flexibility. It allows you to do astro photography and other applications. And you only need one camera body. When I started this, I had an infrared 590nm conversion camera and then I had a separate camera body to shoot color. So I had 2 identical camera bodies and it was a huge waste of money for me, because once I started shooting infrared, I was not interested in color. I've probably taken 20 pictures with that other camera body. I just realized for me, and actually for a lot of infrared photographers, it becomes strange to take color photos. But I still kind of recommend that full spectrum conversion just in case if you, for some crazy reason, don't want to do infrared all the time.
Tom: So, if you want to buy a converted camera, I suppose you can buy them at one of the companies that make those, or you can send in any digital camera and they will convert it for you?
Rain: Both of those things are true. Most of the companies that do the conversions like LifePixel or Kolari will sell you the camera already converted, or you can send them yours. I think what I did was I bought a new camera and had it shipped directly to them. So that they could do the conversion and send it to me. I wouldn't worry that anything is going to happen to your camera. I mean, I'm not personally guaranteeing that, but I've felt confident and comfortable sending my camera off to them. I think yes, my recommendation is that you just send it directly to them.
Tom: Rain, for those who are already making pictures in infrared...Different wavelengths will get you different image effects. I was wondering if it's like a creative process that maybe you start, let's say in one wavelength and then you go to another one because it's more interesting...or it doesn't work like this?
Rain: I think it depends on the photographer and what your own aesthetic interests and your creative goals are. I would recommend going onto the website of Kolari Vision or Life Pixel or one of those companies. There you can look at a chart of what different filter wavelengths will look like unprocessed, channel swapped which we can get to in a second, and then fully processed. And you can decide which of those conversions is for you. If we're just talking about a full spectrum conversion, you can use any of those as external filters.
I really liked the 590nm when I started out. The 590nm looks great in black and white, but it also allows you to do a little bit more color. And I wanted to have both of those options. So the 590nm was a good choice for me. I've since experimented with you know, 720nm, 830nm, 550nm, 665nm, and for me after several years, I still come back to the 590nm as the one that, you know, is the most interesting and the most beautiful to me.
And you can always buy more filters on a full spectrum camera. They even sell some of them as packs that are a little more economical and you can get a whole set of different wavelengths for your camera. And that's a super fun way to experiment and try different things.
Tom: I was thinking if you are a portrait photographer then infrared is not maybe so much your thing? I always hear that people's faces are not the best looking in infrared.
Rain: Actually, I think it's amazing for portraits. Infrared makes people look like they have perfect, like baby perfect skin. You can't see freckles, you can't see any kind of imperfections in the skin at all. Infrared penetrates the top layers of your skin. And so because it's reflecting from the tissues that are below the surface of your skin, it gives kind of this translucent look. It's a little bit alien.
The reason that you might think that it doesn't work for portraits, especially the first time you try it, is because our eyes don't reflect very much infrared light. So you have this like beautiful, glowing baby perfect skin and these like vampire-dead eyes. It's a really creepy look. It's pretty terrible actually. And the teeth look very gray and disgusting. But you can go into your editing program and just do a little dodging on the eyes and on the teeth. And suddenly it looks really beautiful and great. You can color in the eyes if you want too.
It's actually really nice for wedding photography, you know, if folks are into that aesthetic. There are people who do wedding photography in infrared. I know a couple of people who do like glamour photography in infrared and work with models that have a lot of tattoos, because tattoos look very striking in infrared, you know, it's like very crisp. And on top of that perfect pale skin, it's a very interesting and kind of beautiful look. So it looks horrible the first time you try it before you edit it, but then once you edit it, you see that it's actually a little bit magical.
Tom: Okay, well that's a surprise. Rain, you touched a moment the subject of editing. Can you walk me a bit through your post process workflow, because I suppose it's something you spent hours on after taking a pictures like yours?
Rain: Yeah. You don't have to spend hours editing an infrared photo. I mean, I do, but it doesn't mean anybody else does. That's just kind of a reflection of my need to get things, you know, a certain way. It's often a little difficult to tell how an infrared photo is going to turn out, so you want to kind of quickly do some editing on it just so you can kind of see where it's going. Then you can decide, yeah, this is really going to be great or this isn't quite right.
The normal way that people begin the editing process is to import the images into your computer. Then there's a custom profile that you want to apply to your to your images.This custom profile is specific to your camera, and it's something that you can create or you can download. There are a few people that offer them or you can just download free ones online. What this custom profile does, is move the temperature of the photo. When you import your photo, it's going to be like I described a little bit ago, because that's what your camera sees. So when you try now to change the temperature using the color sliders, you'll find that you can't move it all the way to blue, and it's still too red. There's really nothing you can do about it because like, for instance, in Photoshop you just max it out on the slider and it doesn't do much.
So what this profile does is give you a way to kind of move that window, and move the entire temperature of the image in the first place when you first import it as a RAW image. And then the sliders will work for you to actually be able to set the white balance, and change the color of the raw image so that it's something that you can work with. So it's going to go from red to kind of a sepia and then a dark blue color. Sometimes it can vary a little bit, and it depends heavily on the frequency of filter that you're using. So you need to have this custom profile, well you don't actually technically need this profile if you are processing and black and white. But I'm kind of letting people know about it because if you want to work in color, then you're definitely going to need it.
Once you have this custom profile it's just a file that sits on your computer and you never need to create another one again, unless you get a different camera and then you'll need a new profile that goes with that camera. It's one click in Lightroom or in Camera Raw to apply that custom profile. And then you can sort of do some basic editing and camera raw if you want to do adjustments. Usually you'll want to adjust the contrast a little bit, maybe add a little bit of clarity or dehaze to give it a little bit more pop. And then you can open it up into Photoshop and begin editing normally.
Except there's one other step that's particular to infrared, which is called a channel swap. And what that means is you are going to create an adjustment layer and using the channel mixer. And you're going to set the red channel to a hundred percent blue and zero percent red and set the blue channel to a hundred percent red and zero percent blue. And this is going to flip your colors around so that your previously sepia looking sky, is now going to be blue and your foliage is going to be very pale gold or white. And that's what gives you the basis for doing the classic edits of 720nm or even 590nm. Now you've got this beautiful blue sky and then this gold or white foliage and then you can use different adjustments like hue saturation and others to get the colors exactly the way you want them.
If you just want to process it in black and white, you really don't need to do that channel swap step at all. You can just use whatever you like. You can use a black and white adjustment layer. You can use a third party plugin like Silver Effects or a bunch of others that I haven't experimented with a ton.
So there are a couple of special steps. Just as a recap: One is applying that custom profile and the other is doing a channel swap. And those are pretty standard steps if you want to do color work in infrared. That's why it gets a little bit, you know, the editing can get a little bit complicated because again, it doesn't have to get complicated for you. It has to get complicated if you're me because I want to make sure that the colors look really clean and I'm removing any color cast that I don't like, and I might use a different color, a different hue in the shadows versus in the highlights, to give it a little extra depth. You can keep advancing your editing process as you learn more.
You don't have to do any of this stuff right away. But since I've been doing it for a few years, every time I learn a new trick or a new tool in Photoshop, I immediately want to apply it and then start editing. Kind of adding up all of these different techniques into making images that I think are kind of pushing my creative vision further and further.
Tom: And you're doing a great job there with your images Rain, they are fabulous. As usual, I will have in the show notes her KelbyOne class link and her website so you can check everything out there.
Rain: Excellent.
Tom: Rain, if let's say, I'm a landscape photographer and I'm good at seeing a composition in front of me with my camera. The moment I switch to infrared, do I need to start thinking different about composition? Because maybe these plans or this trees or this mountain, they don't reflect the right light in the picture suddenly?
Is there a danger I get swept away by all this magical change that I am seeing in my viewfinder?
Rain: Excellent point. It's very easy to get swept away in how cool infrared looks when you get your converted camera or you're using a filter on your regular camera. There's a step you can do to help you visualize your images in infrared, and that is to set a custom white balance. All you need to do is with that filter applied, take a photo of you, can use asphalt, you can use a gray card, you can use any sort of neutral looking surface. It's going to just talk like a red picture and then you set that as your custom white balance. And suddenly you're going to see your landscape or whatever you're looking at through your viewfinder, or on your live view in infrared, and it's amazing. You're walking around like you're walking around in Wonderland. It's so cool. It's very easy to get caught up in that and just start taking pictures of things and forgetting all about your other principles of composition and light and artistic vision and things like that.
So I want to say like, first of all, that's perfectly fine. Go out, go hog wild, have a good time and enjoy what you're doing and get your fun without having to feel like constrained by all of these technical and creative considerations. Like just have fun! And when you're ready, look at your photos and see if you're happy with what you're getting, if your compositions are well formed and balanced and interesting, if your lighting looks right. And then once you start critiquing your own images, then you can begin to apply those principles so that you're making images that are you know, that are good images rather than just fun. So balance the fun and the idea that you actually want to make like a good image.
Tom: Good advice there, Rain.
Let's move a bit to something I am a bit more used to, well in part...macro photography and UV photography. Let's go Rain, explain me quick the two kinds of UV photography that exist.
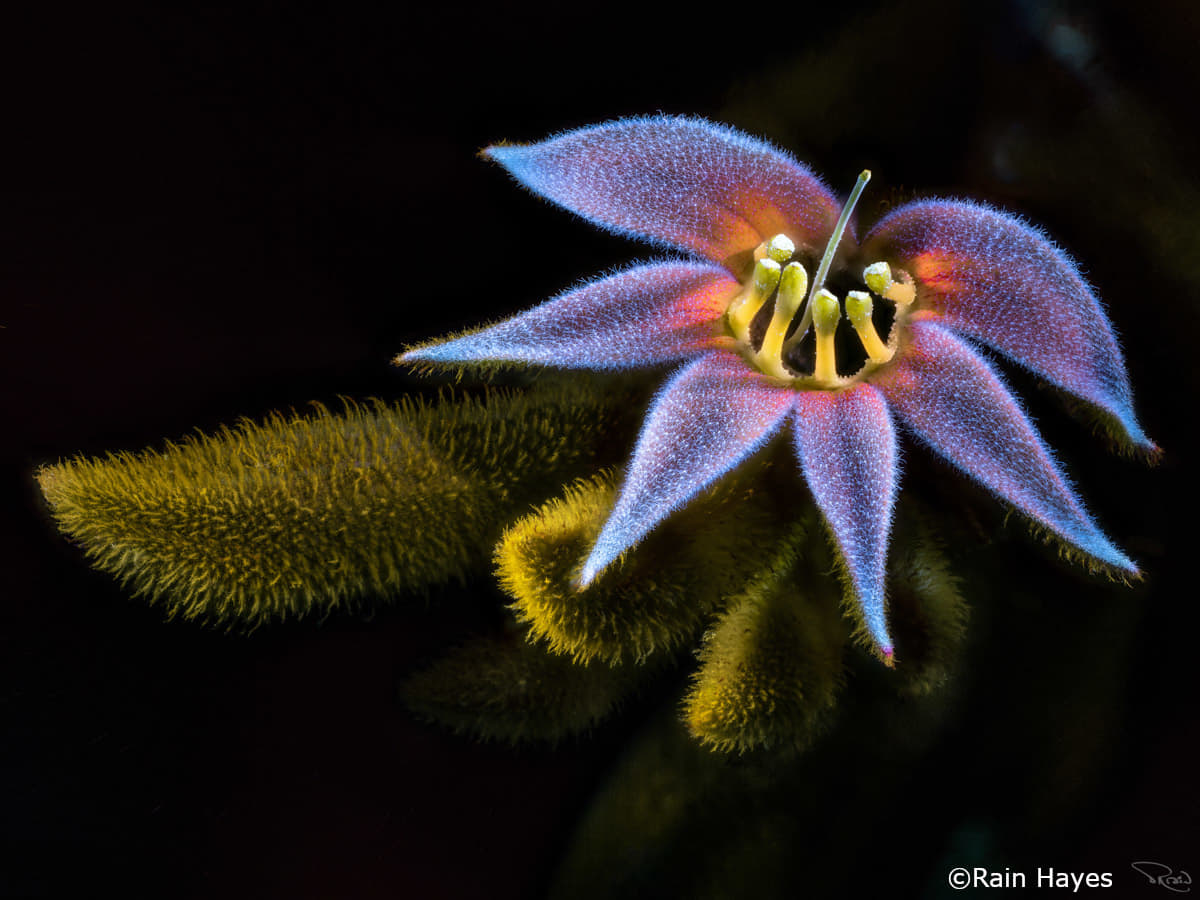
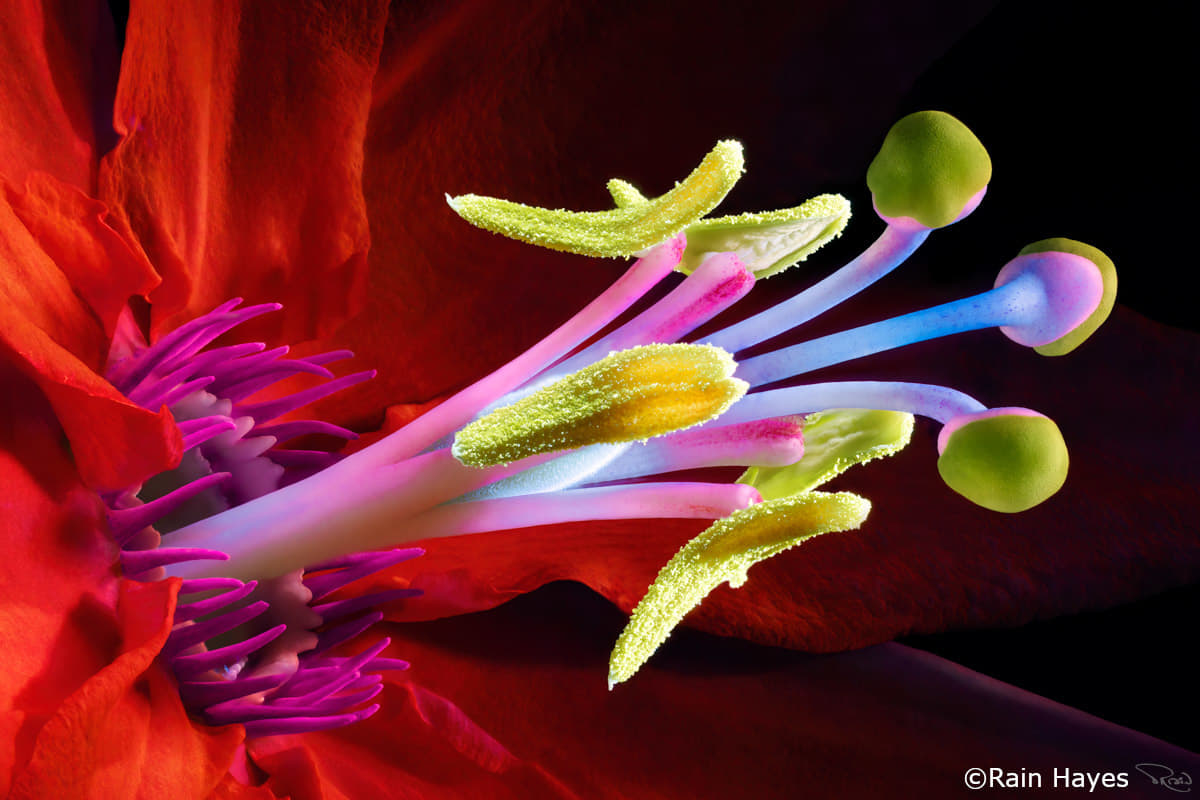
Rain: All right. So we talked about the visible spectrum and how infrared is just on the other side of red. Well, just on the other side of violet is ultraviolet. And what that looks like is 365nm instead of the 720nm of infrared. So you're on the other side of the visible spectrum, and what this looks like is well, it's like a black light you would have at the club or what makes your t shirt glow white. That same black light can also induce fluorescence in plants. So you end up with plants that have little bits that seem to be glowing and are super bright and almost look like they are generating light. And the super cool thing about this is, is that the plant is generating that light. It's not the UV reflecting off of it, it's the UV that is exciting this fluorescence in the internal tissues of the plant and causing it to create its own light. So I'm totally fascinated by this process. It's completely different from infrared. The colors are super saturated and they're neon. And it's very different from having to work so hard to coax these interesting, subtle colors out of infrared. You are just getting like punched in the face with color and light with UV. So it's very fun.
As you said, there are two different types of UV photography. I do one and I don't care about the other. The one that I don't care about is UV photography. That is basically a black and white medium where you need a special UV filter. That's very, very dark and these filters are super expensive. It's going to have kind of the opposite effect of infrared. If you take a photo of a person, it's going to show every freckle you never even noticed that you had, it's going to show all the sun damage of your entire life on your skin. These different types of light reveal different details in the things that we're photographing. Usually those things are alive and it's an interesting medium, but it's very kind of gritty and hard looking to me. I'm not super interested in it, but I've seen some people do cool stuff.
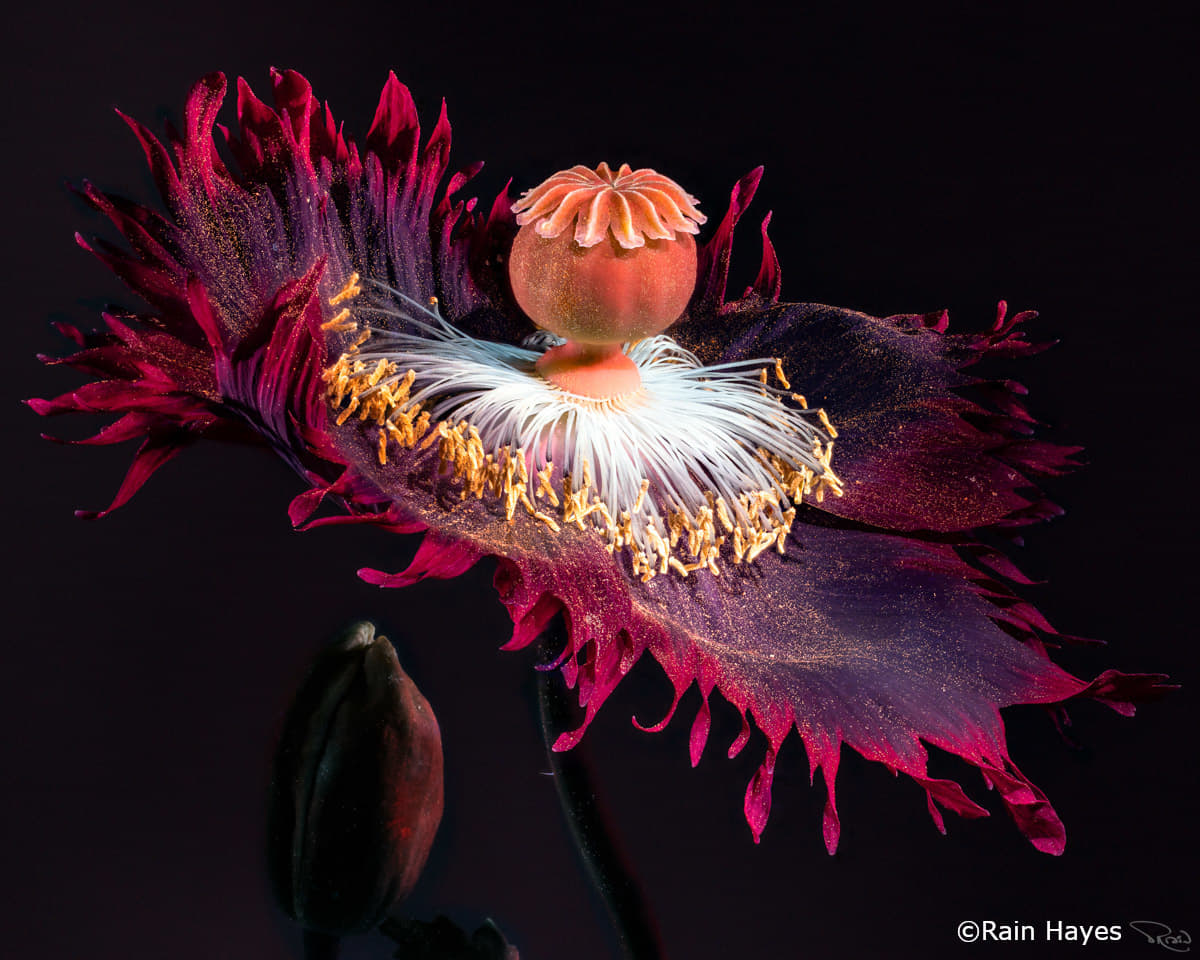
The work that we're talking about here, we usually call it UV photography, but it's really the UV IVF, the Ultraviolet Induced Visible Fluorescence photography. And that's what you see in some of my images, like a flower with a dark background and parts of that are lit and kind of glowing brightly. So UV IVF is what we're talking about.
Tom: And then we need also a dark place, like you told before, and we need this magic light. You made me buy it the last time we spoke, I have it here somewhere. Look, you see my magic light here? If this video gets out on YouTube, the people will see it.
So explain a bit more what we need to make these pictures, Rain.
Rain: So that's your blacklight, that's your source, it's 365 nanometers you can buy it off Amazon or you can buy it from a lot of different sources online, depending where you are in the world. The brand isn't super important but what is important is that you're getting 365 nanometers, not 395nm, and do not get anything below 365nm.
The reason is because there are different bands of UV. There's UVA, UVB as you see on your bottle of sunscreen. And then there's UVC. UVB and UVC are dangerous, you do not want to use those, those are the lower frequencies. The 365nm is UVA. It's our ordinary black light, it's the same UV that is coming from the sun. Well, all of these types of light are coming from the sun, but the UVA is really widespread and everywhere whereas the UVB and the UVC get a little bit filtered in the atmosphere.
I want to just let folks know before I forget that all types of UV light are damaging to your eyes and to your skin. So you should never point a UV light at a person, definitely not point it at anyone's eyes. You want to wear safety glasses when you are working with these, any type of polycarbonat glasses, like the mag safety glasses, those work fine. Polycarbonate naturally filters over 99 percent of UV light. Your normal reading glasses will work, but they're not particularly protective if they're not, you know, covering a large part of your face. If you are using a lot of UV lights or you're exposing yourself for a long period, you could wear a mask like you would wear if you are working in a metal or a wood shop, just a polycarbonate shield. I also like to wear little sun gloves, they're like little fingerless gloves just to protect my skin if I'm kind of working in that UV light. The damage that this stuff causes is long term. It's not going to give you a sunburn right now, but if you were careless and got a ton of exposure, you could develop cataracts and things like that later. So that's my lecture on safety. Please wear your glasses and don't let your kids play with this stuff.
This light can be bought for probably 20 - 25 US dollars, like I said, on Amazon or anywhere else. Then you can take it in your dark room. And there are different ways that you can do this work, but you're going to probably need a long exposure. So you'll want a tripod and usually some way to hold the light, some type of clamp. I use the Platypod products a lot, they're like these small little tripods with bendy goose necks and little clamps. They're super easy to manipulate and maneuver the lights around. When I started out, I was just hand holding the light for like 10 - 20 seconds, holding my breath, holding the light on the flower, taking the photo, but it's cumbersome. So that's when I started using the Platypod products to help me out with that.
Tom: Ok. And long exposures, what we are talking about here Rain?
Rain: I like to keep my ISO low, especially when it's, you know, it's a super dark environment, you're going to get a lot of noise no matter what. So I try to keep my ISO at 100. And if you're not focus stacking, you're just taking a single frame shot, you are probably going to want to use an aperture of like F16 to F22, so you're going to need a long exposure time. It really depends on the flower, but I would say somewhere between like 7 and 30 seconds, usually.
It's very hard to tell which flowers are going to fluoresce and which ones are going to be just total duds. Some flowers reflect infrared light really easily, and some just seem to absorb it, and no matter how much light you put on it, it's gonna look dull and horrible, and feel like a waste of time when you're editing this photo. So, you just want to experiment with that and with each flower. Figure out you, I mean, you'll see right away how much it's kind of glowing and you can use that to determine what your exposure time should be.
Tom: I want to touch a moment about the cleaning process of the subject in your picture, because I looked at some with the black light, and it's true that every little speck of dust shows up glowing. Of course it can be fun to see it, because it all glows like mini fairy lights, but I suppose you do a lot of cleaning up work afterwards in post processing.
Rain: It's true. The thing that glows brightest in all the world is dust. And at first you won't notice it. The first few pictures you take, you're going to go: “Oh my goodness. It sparkles. It's amazing. It's like a unicorn.” And then when you look closer, you can really differentiate between, say pollen that glows like gold dust and house dust, which is going to be purple and often look like little tiny fibers. So I recommend trying to start with a clean flower, and working with something from the florist is always going to be more dust free than something that you picked from outside. I do like to use things that I picked from outside but I try to pick things that are not right next to the ground or in a dusty location.
I also, like I said, work in my bathroom. One of the reasons that that's an ideal space for me is because the surfaces are tile and painted walls, and it's a relatively low dust environment. So try to start with a clean subject is my first advice.
My second advice is in the editing process, you could spend hours clicking on each little speck of dust that you don't want on your photo. And that's a personal decision of what works for in your image. I always go back to make sure that you are enjoying the process and what you're doing. If you're going to spend hours clicking on dust and hate doing that, then then don't do it. You know, you can still make these images and you can have like some house dust sparkles and that's fine. I like my images super clean, so I'll totally spend the time tickling them up. But it's really not like something that is make or break for sure.
Tom: Rain, talking a bit about your creative process. I think you told me once that you always love to learn new things, even things that don't have to do with your photography life.
Rain: Right.
Tom: Does this mean you are always searching for some new creative process to keep your mind in a happy place?
Rain: It's kind of the opposite actually. I'm a person who is just kind of naturally interested in everything. I don't think I've been bored for a single minute of my life. Like everything it's just amazing. And life is interesting. Nature is so interesting. And when I started the UV, I was only going to try it like one time. I just popped into the bathroom with a flower I got at the farmer's market, and here I am almost a year later and I've got like 100,000 frames, focus stacked or whatever, of UV images. I mean, it's over two terabytes on my hard drive of UV images, and I was just going to do it for five minutes. I keep trying to quit doing the UV and maybe move on to doing some other things, but it's not working. Yes, send help!
Tom: If I remember well, you grew up in a more rural area, and now you living in the San Francisco Bay, which is a city environment. Did your photography changed for more a city or architectural view, or do you always feel the call back to nature?

Rain: I have done some urban environment pictures. Architecture is actually a really interesting infrared subject, the coatings that they use on some of the glass on skyscrapers create these really interesting and unpredictable colors. I was totally surprised when I started doing that to see some of the colors that I was seeing in infrared.
Where I live in Oakland, in the East Bay of San Francisco, it's like seven miles from San Francisco properly. We have a ton of open space and park land. I can be in the redwoods in 10 minutes, I can be hiking in the hills in 20 minutes to where I don't even have cell phone service. There's so much space and the terrain around here is just incredibly beautiful. We have the redwoods, we have mountains, we have hills, so many different places you can go. And San Francisco is also just very conveniently located to places like Yosemite and Death Valley and, you know, these really major places of like extremely beautiful landscapes.
So one of the reasons I like photography, frankly, is because it gives me an excuse to go hiking and spend time outdoors and still be doing something productive. You know, it feels almost like I'm pulling one over because it's kind of hitting all of these different needs and desires that I have, to be in nature, to be doing something creative, to get exercise, to be alone in my thoughts or with a small group maybe. So I do find myself kind of gravitating toward those landscapes for all of those reasons.
I went out to do some landscape photography on Sunday and came home with a whole bunch of samples of wildflowers to do for the UV. So boundaries are crossing here and I'm getting beyond the comfortable level of busy with the number of projects that I want to do while still being a responsible adult in other areas of my life. I'm sure you don't know what I'm talking about, right?
Tom: I have no idea. This is why I try to run a podcast in the middle of the night here.
Rain, to come back a moment to your amazing macro UV flower images. As an artist, what you want people to feel when they see your images. What is your goal there?
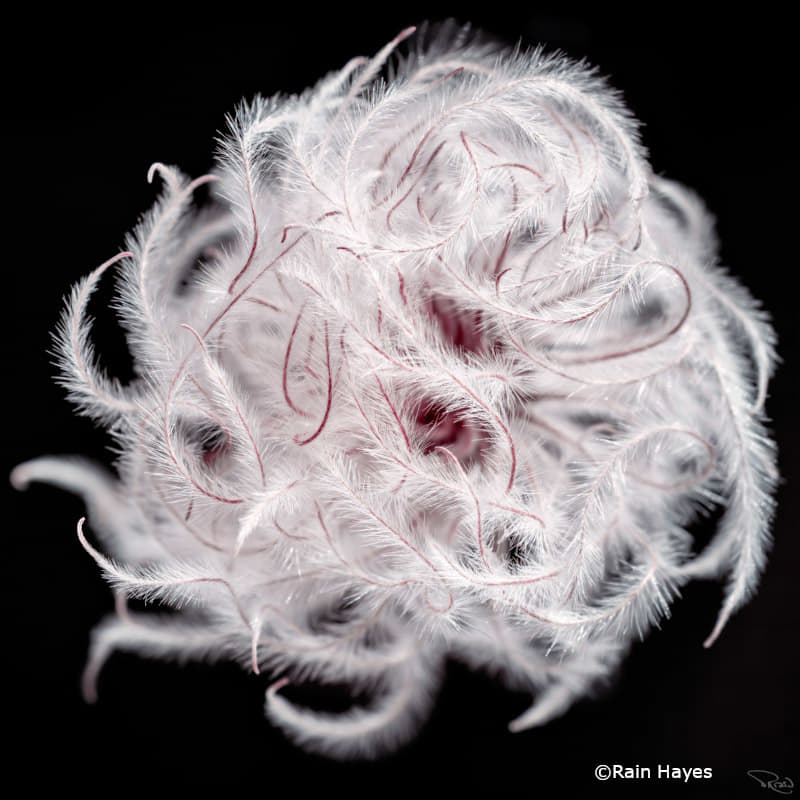
Rain: I think, and it feels a little cliche to say, but I want people to notice what I'm pointing my camera at. I just find so much wonder in tiny little things that are unnoticed and beneath our feet, like weeds that are all around us, billions of them all the time. One of the most common descriptors that people offer about my UV macro work is Alien. And to me that says that people are seeing these things in a way that they really haven't noticed them before. Like they're very familiar when they're at a distance and they're blending into the background, but when you look at a dandelion close-up or a seed of a stork bill, it's like a corkscrew with a pointy end and barbs all over, it's really interesting to see all of the forms that nature can take that are so beyond human imagination. There's nothing that we can do to compete with how cool nature is.
I really also want to give people some beauty to look at. I think life is difficult and people are under a lot of stress. I think we're at a point in history where there's a lot going on. And with technology and being online all of the time, I think it's easy to be overwhelmed. Marketing is so powerful, we're constantly being pulled into look at this and do that. Pay attention to this, pay attention to this, you know, like the number of ways that meta tries to get me to check my notifications for four different platforms by logging into four different accounts, to see the same notifications, it's really hard to shut all of that stuff out but remain connected in the way that we want to be connected to one another in the world.
So if I can offer people just a little bit of a distraction from that and show them something that is beautiful, or that makes them say “Oh, wow” then that's really what I want to do. I'm fully okay not having a message in my work. There's nothing lofty or intellectual or political or anything like that. No messaging in my work. It's just like, Oh my gosh, look at this. Isn't this cool? Isn't this pretty? And for me, that's the whole story and that's enough, is that beauty.
Tom: You touched the moment there social media Rain. Let's say you in your mentor role, if people ask you, I want to be part of a photography community online. How would you go ahead in this? A media platform to show your pictures just to be seen or to inspire others or just to enjoy seeing pictures from other photographers?
Rain: Social media is kind of a tough one for me. I really want to be connected to people and you know, I'm on Facebook cause I want to see people's kid pictures. I want to see the parties that they went to and whatever they had for lunch or whatever. I want to see what people are up to. And it allows me to stay in touch with people in a way that is difficult without that.
As far as like having your creative work online and connecting with people through that, we've got a lot of different choices for social media platforms. None of them are super great for photography right now. There are some really small companies that are photography specific, but there's not much of an audience there. There's a handful of other photographers you can connect with, but you're not really going to reach an audience outside of kind of your own community, your peers, if you will.
I think the important thing is to engage. So if you just go online and post your pictures and hope that people are going to notice, it's very hard to make that happen. That's not how the algorithms work. The algorithms work based on your interaction with others. If someone does notice your work and they comment on it, you should thank them for it. You should make that connection with them. If you like someone else's work, then you should let them know and try to offer a meaningful comment about the image that's not just like cool sunset, bro. Or something that's like amazing. You know, something meaningful is what creates a genuine connection.
It's not great if it's causing you any kind of distress or feels like a waste of time. It doesn't feel so great when you post pictures that like is your best work, you're really proud of it, and then you go online and you see work that's a lot better. And that happens to all of us. And it just, it doesn't always feel great to be exposed to tons of other artwork. Even though you kind of want to, but then it's not always the healthiest. So I think it's really important to in social media, in your art, in your life, to know who you are, and have a really good understanding of who where you are at in your life. And don't compare yourself to other people, that is just a, you know, recipe for feeling horrible.
Everybody is at a different point in their own lives and their own journey. Often people who have an overnight success, have been working really hard on that for 10-15 years getting no traction. And then suddenly it's overnight after 10 years of really hard work, but we don't see those 10 years, we just see that someone for the first time, and they're super awesome and getting all this attention. So, you know, don't compare yourself to others, know who you are, what you are on social media for, and for the love of God, get off it if it's not working for you. It's not that important.
Tom: Very true. I think to inspire people is also why we also do this. The podcast really is to show that in photography, you can never be stuck. There are so many genres you can try. We try to touch all the bit all the genres, so that maybe you listen one day when you're stuck in landscape photography and you start to try out portraits, try UV, try any other genre. You start it out cheap or we can buy all the bells, but whatever, don't get stuck because it's a fantastic visual medium.
Rain: Yeah. You know, I only started doing this macro work because it was during the pandemic, and I also had a couple of years where I just had constant migraines, and I really could not get out into the hills to go hiking. I was just not feeling well at all, and I couldn't walk around with this like 15 pound pack of camera. I was super grumpy about it too. So I just started, I found some little weeds outside my own front door and put them on my coffee table and started doing the macro photography right there. It was very simple. But it was a way for me to do something that kept me involved and kept me busy until I could get back to doing the landscape stuff that I really wanted to do.
Now, here we are like a couple of years later and I have to make very deliberate efforts to go back out and do the landscape, because I'm enjoying doing the macro photography so much. So whatever your circumstances are, whatever your level of physical ability, whatever your finances you have to put toward this hobby, it really doesn't matter. You should just use what you can get and maximize that. Go be awesome within those parameters. Because if you had no parameters, your creativity wouldn't encounter any resistance and it wouldn't be forced to kind of exercise and figure things out and get stronger. I'm a huge advocate for having some kind of limitations. And if you have built in limitations like health or money, then all the better for you and your creativity.
Tom: Very well said Rain.
I think we can go on for another half hour of podcast, but I'm sure we both have things to do and you have flowers to make pictures off in the dark!
Rain, thanks a lot for this talk and your insights. I think if we talk a little bit more, I will have to buy a converted camera and then I will have another thing on my to-do list! Let me first try to make some macro UV pictures and I will send them and you will give me your opinion about them.
Rain: Tom, I am so appreciative to be invited onto your awesome podcast and to get to be part of that. I've loved our conversations and it's been really great to make a new friend and also to just look more closely at your work. Like I said your insect photos, your bees, really do kind of put a bee in my bonnet, so to speak, to motivate me to do that as well.
And when we talk about like what creative things we're going to do next, because we're always changing, I really do want to explore insects. So I have you to thank for that motivation. And I'm yeah, I'm super happy to be face to face in conversation with you.
Tom: That's amazing to hear. Thank you Rain for the words, and any questions you have, just send me an email.
Rain: Sounds great.
Tom: Thanks a lot for our talk and I see you around then with new amazing macro images.
Rain: Likewise. All right. Thank you.
Tom: Have a nice day still Rain. Bye.
Rain: Bye.
Outro:
There you go, how was that for an inspiring podcast episode? I hope you enjoyed our conversation with Rain as much as I did, and you learned something new along the way. Her dedication to show us that invisible world through her infrared and ultraviolet photography is truly inspiring, and her practical insights I think offer a great guidance for photographers at all levels.
You know, if you want to see more of Rain's stunning work, check out her Kelby One class or visit her website, all those links you can find back in our show notes. Remember to follow us on your favorite podcast platform so you never miss an episode, and if you loved today's show, please leave us a review, and share it with your friends, that would be awesome to keep us going.
I leave you today with this quote of the British novelist and journalist William Thackeray, who said already in 1850: “The two most engaging powers of a photograph are to make new things familiar and familiar things new.”
Until next time, this is Tom Jacob signing off. Keep capturing those unique moments, keep on moving your photography and see you in the next episode of The Camera Cafe Show! Adios!